Thursday, October 31, 2013

Happy Halloween

It's Halloween today!  And it's my turn to be featured on the social media sites at Inspired By Stamping, so I created something seasonally appropriate.


These pumpkins were stamped on patterned papers using Pumpkin Faces (minus the facial parts ;).  After inking the edges, I stamped on some spiders and cobwebs from Halloween Tags, and a big spider from A Spooky Halloween.  A bit of twine stands in for vine tendrils.


I used a label from Halloween Labels as my sentiment.  It was heat embossed in black, then I got inky with a sponge and shades of purples.  The moon was colored with Copic markers.


Thanks so much for dropping by today!  Happy Halloween to those of you who celebrate it.  :-)


Stamps: Halloween Labels, Pumpkin Faces, Halloween Tags, A Spooky Halloween  - IBS Paper: Pumpkin Pie, orange patterns - SU; black & white - The Paper Studio; white Ink: Versamark, Memento Tuxedo Black - Tsukineko; various purples, orange Fibers: black ribbon - Michaels; Pea Pod twine - The Twinery Accessories & Tools: black embossing powder; Copic markers; Labels Four die - Spellbinders

Wednesday, October 30, 2013

Spooky!

It's just one day until Halloween here in the U.S., and we are all set for our trick-or-treaters.  My kids are old enough now to go on their own (with other friends), so it looks like I'll be home to hand out the candy.
I've got a picture of my older daughter in her costume further down this post, but first, a Halloween card.


Though it's been a while since I bought a $1.00 Scrap Bag from my Stampin' Up! demonstrator, I still have so many wonderful things from those bags.  This entire 'card kit' was in one of them.  Absolutely everything you see on this card was put together in a clear envelope, right down to the snippet of ribbon and stamped, punched image.  The bats were already glittered, paper panels already trimmed.  All I had to do was put the pieces together!

There are black-embossed spider webs on the black panel...can you see them in the photo below?  


I know the witch's feet come from the set Wicked Cool, but I am not sure about the sentiment.  Do you mind if I skip the Stamping Supplies section I usually include in my posts?

Here is my "Couture Clown":


The cuffs, neck collar and tutu were all no-sew projects, using nothing more than tulle and ribbon.  I used THIS tutorial to help me out.  The directions are for one adult-size tutu, but I simply adapted them for the cuffs and collar using a narrower ribbon and strips of tulle.  And, in case you are going to do this too, please know that I did not sew the ribbons as the blogger described.  I'm not really sure why she went to the trouble.  I used a long length of ribbon as the 'waistband' and added all those tulle strips, no sewing needed.

The hat was made with a dollar-store party hat, covered with three coats of white craft paint.  Three different sizes of Styrofoam balls were cut in half, painted black and covered with black glitter, then glued to the hat with a hot glue gun.

I think we spent less than $8 for this costume (unless you count the black leggings and black bodysuit; then it's over $25) because I used ribbon I had on hand.

See you tomorrow with another Halloween card, one I really love.  :-)

Tuesday, October 29, 2013

Love Sweet Love Engagement

My sister-in-law got engaged not too long ago, and I made a special card to express our excitement for the happy couple.


These Vintage Blue stamps are by Glitz Designs, and I was so excited when I found them at Hobby Lobby a year ago.   Love the shabby chic, vintage vibe of them.


My SIL is very much into fleur-de-lis images, so I made sure to include a couple of those on here.


Thanks for popping in today!


Stamps: Vintage Blue - Glitz Design; Paper: Crumb Cake, Bordering Blue, Very Vanilla, pattern - SU Ink: Crumb Cake, Bordering Blue - SU; Antique Linen - Ranger Fibers: white seam binding - Hug Snug; twill - SU Accessories & Tools: doily - Wilton; pearls - Recollections; corner round punch - Fiskars; White Opal Liquid Pearls - Ranger; Floral Oval die - Spellbinders 

Monday, October 28, 2013

CASE'd Thanks

You know some days those fabulous ideas for cards come to you easily...and other days, not so much.  I needed some help the day I made these thank you cards.

On Pinterest, I found a card very much like what you see below.  Can't find it on my boards now, mind you.  I think it was by a PTI gal, maybe Nichole Heady.  I SO wish I could link up for a credit!  Sorry!


Both cards used up some scraps and the Stampin' Up! set called Kindness Matters.  I'm not sure if ever inked it before now.  Sheesh.  What was I waiting for?  (too many stamps, not enough time...)


Stamps: Kindness Matters - SU Paper: kraft, white - PTI; patterned scraps - SU Ink: Memento Tuxedo Black - Tsukineko Fibers: twine - Creative Impressions Accessories & Tools: Fancy Labels 2 die - Inspired By Stamping

Saturday, October 26, 2013

Sympathy in Aqua

Always, always, my "Sympathy" category of cards at the shop empties out much too soon on a regular basis.  It's a sad reminder that death is a part of life.  When I make sympathy cards, I try hard not to think about the loss involved.  Instead, I focus on creating something with soft beauty that will offer quiet peace to the recipient.

Something like this...


Very few materials were needed for this, and the tranquil shades of aqua seemed perfect.  The silhouetted flowers and sentiment are from Hero Arts.

Thank you so much for dropping in today.  See you soon...


Stamps: With Sympathy - Hero Arts Paper: pale aqua - Mark's Finest Papers; Luxury Stack - DCWV Ink: Versafine Onyx Black - Tsukineko Fibers: white seam binding - Hug Snug 

Friday, October 25, 2013

Leaves Aglow

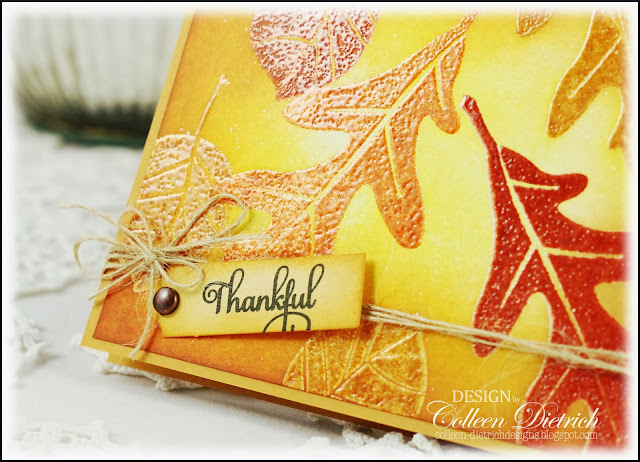
I was digging through my card stash recently, and came upon THIS card of mine from 2009.  That was pre-blog!  At the time, I was crushing on a crafter named Michelle Zindorf, who is a master at sponging scenes with ink.  I made the autumn card you see below in her style, minus the twine and sentiment.


After rediscovering it recently, it looked too plain to me.  Funny how our opinions and taste change over time.  Back then, I did not want to cover up my emboss-resist art.  Now I've added a tag with a sentiment from Happy Fall (Inspired By Stamping), some twine and an aged copper brad.


I thought Michelle's technique of emboss-resist was very cool.  She inks her stamp first in Versamark watermark ink, then onto a dye ink pad.  Stamp image on cardstock, then sprinkle clear embossing powder on stamped images, and hit with the heat tool. When it's cool and dry, sponge on dye inks.  I used three yellow inks and I think an orange ink to create the 'glow' you see.

Thanks a bunch for visiting me today!


Stamps: Autumn Fest - SU; Happy Fall - IBS Paper: More Mustard, Whisper White - SU Ink: More Mustard, Really Rust, Summer Sun, Pumpkin Pie, So Saffron - SU; Versafine Onyx Black, Versamark - Tsukineko Fibers: twine - Creative Impressions Accessories & Tools: brad, tag - SU

Wednesday, October 23, 2013

A Punkin Birthday

Earlier this month, my youngest daughter turned 12.  Where does the time go?!  To celebrate, she had a bunch of girls from school sleep over, and it was the most we've ever had sleep over at one time:  8, plus my kid.  I know for some families, that's nuthin'.  For me, 8 guests is a HUGE deal.  We have a small house, and only one living room; no family room or den or anything else of the sort.  We do things out of our comfort zone for those we love, don't we?  The birthday girl loved it, and that's what matters.

This is the card I made for her:


I dug through my scrap basket and found this ridged black scalloped oval die cut, and orange circle die cut, and matched them up with some stickers from Jolee's Boutique.  No pearls this time, but black gems instead.


I hand-wrote the "boo!" sentiment.  Nothing in my stamp stash fit just right in that little area.

If you've got little ones (or grandkids), what will their Halloween costumes be?  My birthday girl is not sure, and my older daughter is going to be a "Couture Clown".  Pictures will definitely be shared!  We're in the process of working on her costume.

P.S. Paulette Manion, if you are reading this, you had asked me how I made the leaves for the autumn card in THIS post.  I tried to find a way to contact you, but couldn't find one.  I used Martha Stewart punches:  Rose Leaf and Maple Leaf to create them.  Hope that helps!

Tuesday, October 22, 2013

Halloween Kitty CASE

Not too long ago, I had Pinned a card that looks very similar to the one below, over on Pinterest.  I fell in love with its simplicity, and knew I could use my Cool Cat (Stampin' Up!) kitty (far too neglected) for it.


The sentiment is from Inspired By Stamping's Halloween Labels.  I added green eyes to Kitty with Smooch Ink, and some green bling among the orange swirls (Baroque Motifs - SU).


This is for my SIL, whose birthday is Halloween.  So inside, I used a hat and witch's legs from Wicked Cool (SU), and a sentiment from Inspired By Stamping's Fancy Sentiments.  


Thanks for taking a peek today!


Stamps: Cool Cat, Baroque Motifs, Wicked Cool - Stampin' Up!; Fancy Sentiments , Halloween Labels - Inspired By Stamping Paper: white - PTI Ink: Versafine Onyx Black - Tsukineko; Pumpkin Pie, Soft Suede - SU Accessories & Tools: corner rounder punch - Fiskars; green gems - Michaels; green Smooch Ink

Monday, October 21, 2013

More WorldWin Goodness to Share

Remember the other day, here on my blog, I shared some projects made with Inspired By Stamping and WorldWin goodies -- for the Holiday Blog Hop?  I made a couple extra cards, just because.

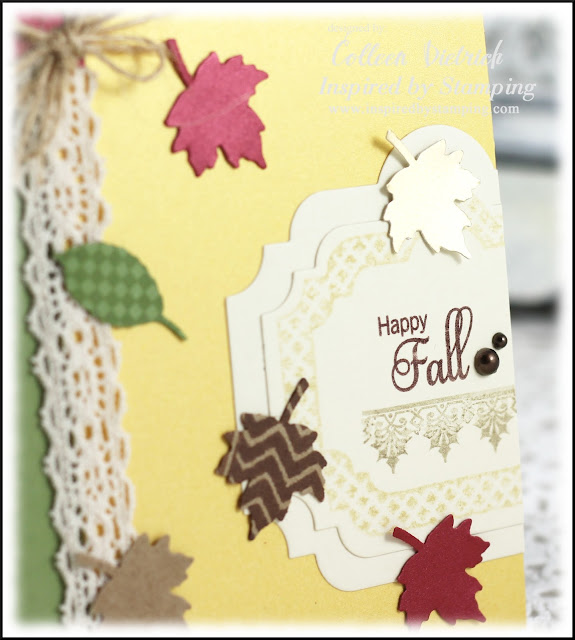
First up is an autumn card with lots of  falling leaves.  This was fun to make!  I used lots of fun WW products on here:  Petallics® Wine Cup and Gold Ore (that beautiful, shimmery yellow), Worldwin® Cardstock Packs - Ivory and KraftKromekote® Brushed Gold Foil Mirror Finish, and Original Colormates® Dark Spring Green.


Can you see the shimmer on the Gold Ore cardstock?  It's there on the Wine Cup leaves, too.  On some of the leaves, I stamped patterns from IBS' Background Basics II and Whimsical Banners.  The White Crochet Tape added a nice feminine touch.


There's one brilliant Kromekote® Brushed Gold Foil Mirror Finish maple leaf here, resting on a frame made with a frame from French Country.  The sentiment is from Happy Falland the flourish is from Fancy Label 18.


I know it's not the time of year for strawberries, but I love them any time of year!


I used Original Colormates® Deep Belgium Blue for the base, then topped it with a bit of Translucent Vellum™Clear Inkjet Printable Vellum. The punched borders are made with Original Colormates® Medium Berry Red.

I stamped a birthday greeting from Creative Tags within a frame from Fancy Circles.  The little strawberries from Mason Jar Summer Add On are topped with tiny dots of Liquid Pearls.


One more berry, adorning the white seam binding bow.  :-)


So glad you came by today!  See you soon....

Sunday, October 20, 2013

Wicked

Have you seen the Broadway show, Wicked?  I have not, but my now-15-YO did when she was only 4. She was a HUGE fan of the Wizard of Oz movie, so her grandparents took her to see Wicked in NYC when it first came out.  Sadly, she doesn't remember anything about it now that she's older.  Aaah, youth (and a Broadway show) is wasted on the young!

Wicked has nothing to do with my card, except for the title.  I fiiiiiinally inked up a Stampin' Up! set called Wicked Cool after a few years (ahem).


Just love that fine-lined candelabra.


I dug into my scrap container for some suitable Halloween-ish patterns (all from SU, too) and 'hung' banners from honest-to-goodness bakery twine, then topped with an old SU button and a stamped bat from Autumn Apparitions.


That'll do it for now.  Thanks so much for joining me today!


Stamps: Autumn Apparitions (bat), Wicked Cool (sentiment, candelabra) - SU Paper: Cajun Craze, patterns - SU; Vintage Cream - PTI Ink: Versafine Onyx Black - Tsukineko Fibers: bakery twine Accessories & Tools: green button - SU; thread

Friday, October 18, 2013

IBS & WorldWin Christmas Blog Hop

Hello!  Thank you for joining us in this Holiday blog hop. Inspired By Stamping and WorldWin Papers has teamed up to offer you over 15 inspiring Christmas projects to jump start your holiday season. We hope that you’ll find just the right inspiration for your next Christmas themed project.

Christmas season is all about gift giving, and this hop is no exception. We have planned a very sweet giveaway for a lucky winner:

GIVEAWAY PRIZE: $50 Gift certificate from Inspired By Stamping and $50 WorldWin Paper Pack  

To be eligible for the giveaway, please visit each blog in the list, grabbing the “letter” code as you go. Once you’ve landed on our last blog, which is the Inspired by Stamping blog, you will leave a comment with the secret phrase created by putting together all of those letters that you collect from each blog.

My letter is "I".

Winners of the giveaway will be announced on October 23rd on both the WorldWin Papers and Inspired by Stamping blogs. The designers have worked hard to produce all of these fantastic creations, and we would like to invite you to leave some comments on their individual blogs as well.

So what are you waiting for…let the hopping begin!

You should have arrived here from Gloria's blog.  If you'd like to begin 
at the beginning of the hop, head over to WorldWin's blog.

WorldWin was very generous to us, sending so many different papers to try.  One of the first things that caught my eye is this Kromekote® Brushed Silver Foil Mirror Finish cardstock.  It became the fabulous base for my Christmas card, decorated to look like a present.  It positively gleams!  I have never used anything so all-out glamorous (paper-wise) before.


The gift "tag" on this faux Christmas was made with December 25th Labels from Inspired By Stamping.  I stamped it twice:  first on a piece of Petallics® Wine Cup Smooth & Sparkly Cardstock.  What a pretty color, like a glass of claret-colored wine.  And the sparkle is AMAZING!  Then I stamped it once again on a piece of Worldwin® Cardstock in White, colored it and paper-pieced it.  I used some shimmery Smooch inks to amp up the sparkle.


I love blue and silver paired with snowflakes.  On the next card, the base is Original Colormates® Deep Belgium Blue, topped with a piece of  Petallics® Silver Ore.


I heat-embossed a label from December 25th Labels onto Original Colormates® Dark Spring Green and used a Copic marker to color in the ornaments so they'd match my blue base.


The snowflakes were punched using Petallics® Snow Willow, and the glittery Silver Metallic Tape adds more sparkle.  Sparkle is key where snowflakes are involved!


The next card is perhaps my fave of this trio.


I stamped a zigzag pattern from Background Basics II on a piece of Worldwin® Cardstock Packs Kraft cardstock and layered it onto a Worldwin® Cardstock Packs Ivory base.  I added a strip of Gold Glitter Tape on top of that.


The medallion was made from a strip of Original Colormates® Deep Berry Red the old-fashioned way, scoring every 1/4" and then folding.  I punched a circle of Petallics® Wine Cup to secure on top with craft glue.  The sentiment from Elegant Christmas Sentiments was trimmed and added, along with holly leaves punched from Original Colormates® Deep Emerald Isle and a few red gem 'berries'.  The banners from Whimsical Banners received a touch of gold glitter glue along their tops.


A HUGE thank you to everyone at WorldWin for sharing their amazing products and talents with us for this blog hop.

Your next stop is Grace Tolman's blog.  Good luck on the hop...I hope you win some goodies!!  Thanks for coming by.  :-)

Wednesday, October 16, 2013

Rosy Posy Frame

Here's a magazine reject (boo hoo) from a while back.  I held on to it and tried again and again to submit, but it was never chosen.  Ah well.  Now I get to share with YOU!


Stamped the floral spray from Elements of Style (Stampin' Up!) in pale pink on the card base, and the sentiment is from Magical Moments by Wplus9.   The frame took a while (I'm sure you can tell) to create with lots and lots and lots of punched hydrangea blossoms.  It was kind of fun that day, as I recall.


Thanks for visiting me today!


Stamps: Elements of Style - SU; Magical Moments - Wplus9 Paper: white - PTI; assorted pinks Ink: Pink Pirhouette - SU; Versafine Onyx Black - Tsukineko Accessories & Tools: hydrangea punch - Martha Stewart; pearls - Recollections, Queen & Co.
Related Posts Plugin for WordPress, Blogger...