Tuesday, November 29, 2011

Viva La Verve - Sketch #4

Hello everyone!  Can you believe we are just days away from December??  Wow.  My kids keep reminding me how many days are left until Christmas, just like the little girl on the Hallmark ornament commercial.   ;)  Apparently there's an "app" for that on the iPod.

Photo Credit
We went to see my in-laws in North Carolina for Thanksgiving, and stayed four days.  We had a good time, except for someone breaking into my car (while it was parked in their driveway).  My husband forgot to lock the car because it was raining while he unpacked the car on Wednesday.  Sometime in the early morning hours of Thanksgiving Day, a guy robbed another neighbor's car and mine as well.  Apparently, he was spooked away by my sister-in-law as she went down to her car for something, and he left in a hurry.  The neighbor was missing some DVD players and a GPS, and then called the police.  My car had two DVD players and two GPS units, but he left them!  Amazing.  He took my emergency car kit, the one that holds flares, jumper cables, etc.  Weird, huh?  And he took my husband's golf shoe bag, but not the contents inside (guess he was going to fill that bag like the Grinch Who Stole Christmas).  A funny note - the thief left behind his Bail Bond receipt, with his name and other info on it.  Something of an inadvertent calling card, wouldn't you say?  LOL  Hope the cops catch him.  I am thankful he only took those few replaceable things.

Okay, on to my card.  This is the fourth and final sketch for Viva La Verve in November.  Here is the layout:


I thought this was the hardest of the four.  (Check out my versions of #1, #2 and #3, if you want)  I decided to combine this with The Shabby Tea Room challenge, to make things 'easier' on myself.  We are to use whites, creams, silver and glitter, as in the inspiration pic:


When faced with a difficult challenge, I often resort to using lots of 'white space'.  In this case, the whole card is covered in shades of white and cream, with some dashes of silver thrown in.


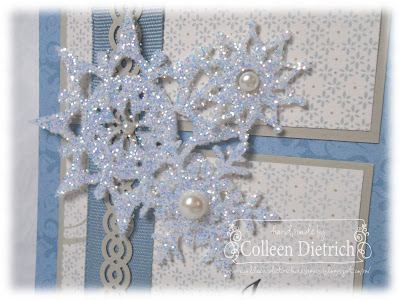
I could NOT get a really good shot of this, and believe me, I tried.  So here are some close-ups for you to appreciate it better:


This little clear die cut corner from K & Company is actually gold.
I turned it over to find a silver side...just what I needed!
This beautiful little charm is new to me.
Isn't the green stone pretty?
I shopped at Tuesday Morning in North Carolina
and found AMAZING steals on Girls' Paperie kits.
They usually go for $55. I got mine for $19.99!
It's got ALL kinds of goodies inside.  :)
I'm also entering this at 4 Crafty Chicks, where the theme is "snowflakes".  My friend Victoria Lavender is the guest designer there.  :)

Thanks a bunch for coming by today.  Let me know what you think of my card today!

Colleen

Stamps:  none
Paper:  white - PTI; patterned - Lost & Found Blush - My Mind's Eye; patterned - SU specialty wedding pack;
Ink:  Antique Linen Distress - Ranger
Other:  Big Shot; Floral Doily Motifs, Fleur De Lis Motifs dies - Spellbinders; Diamonds and Dots embossing folder - Lifestyle Crafts (formerly Quick Kutz); tinsel glitter - Martha Stewart; clear glitter - SU; charm, crochet trim - Girls' Paperie; pearls; silver corner clear die cut - K & Co; lace - Walmart; snowflake die - SU; silver twine - Michael's

Sunday, November 20, 2011

Viva La Verve - Sketch #3

I'm back with the third card of the day, completing my Viva La Verve challenge cards....until the fourth and final sketch is released this coming week.  Each month, there are 4 sketches, one per week.  If you complete all four, you are eligible to win a $100 gift certificate to the Verve store.  I really wanted to give it a try!

If you haven't seen my other posts today for this VLV challenge, you can see them HERE and HERE.

This is Sketch #3:
And here is my card:


I stamped my background with a floral spray from Elements of Style (SU).  The smaller panel with text was stamped with Old French Script (Hero Arts).


I used the same flowers as the background to adorn the circle die cut, and used a Verve sentiment from Joy For The Journey. The roses were colored with Copic markers.


The cotton lace is from Wal-Mart, of all places!  (Great prices in the ribbon department)

I can't wait to see what the final November sketch will be.  :o)

On Friday, I discovered one of my cards has been published in the Dec/Jan/Feb 2012 Take Ten magazine, a Stampington & Company publication!  I'm on page 75 with a clean and simple Christmas card.  The Stampington Company lets you know if you've been published by sending you a copy of their magazine with your creation in it.  I had submitted about 5 cards to them in the summer (you actually have to mail them, and you never get them back), and just crossed my fingers and hoped for the best.  So, this made me happy.  :o)

Thanks for visiting me today, and for letting me know what you think of my creations.  I always appreciate it!

Colleen

Stamps:  Elements of Style - SU; Joy For The Journey - Verve; Old French Script - Hero Arts
Paper:  Basic Black - SU: white - PTI
Ink:  Versafine Onyx Black, Memento Tuxedo Black - Tsukineko
Punch:  Scallop Dot border - Martha Stewart
Other:  Big Shot; circle die - Spellbinders; Copic markers; pearls - Recollections; black ribbon (recycled); white cotton crochet lace - WalMart

Viva La Verve - Sketch #2

I'm back with Sketch #2 of the Viva La Verve challenge over at Splitcoast.  As I had mentioned in my earlier post today, I am participating in this challenge for the first time.  You have to upload a creation for each of the four sketches in a given month to be considered for a $100 gift certificate to the Verve store.  Yummy!

My entry for Sketch #1 can be seen HERE.


I adore this sketch.  I guess it's the traditionalist in me, liking things to be balanced.  So.....I made two cards.
I am also entering these at Just Us Girls, where the challenge is to use Red, Green, and White.

This was my first creation --


You know how I buy those $1 Scrap Bags from my Stampin' Up! demo?  All of the papers you see here, minus the pine cone die cut (from K & Co.) and green paper, came from those bags.  That kraft panel was already embossed and distressed, too.  It sure made this card come together quickly.


To fit the rustic feel of this card, I used three different ribbons to make my bow.  There's some bona fide bakery twine on there, too.

Even though I was pleased with the result, I felt I could kick it up a notch, and created this:


I like this one better, because I don't feel comfortable doing rustic cards.  Many of the same elements are used here, but I added Doily Lace Trim punching in ivory to coordinate with a more feminine ivory bow.  I also added a Verve sentiment from Bright Spirits.


The poinsettia and holly leaves die cuts are from K & Co.


I need to do a bit of tweaking on my card for Sketch #3, then I'll be back here to post it.

Oh, a quick note -- THIS card earned me a Top Spool from Ribbon Carousel.  Thanks, gals!


Thanks for joining me!  I am always grateful for your visit.

Colleen

Card #1 
Paper:  Crumb Cake cardstock, patterned papers - SU
Other:  pine cone die cut - K & Co; bakery twine; lace - SU; gingham ribbon - Really Reasonable Ribbon; pearls; Vintage Wallpaper embossing folder - SU

Card #2
Stamps:  Bright Spirits - Verve
Paper:  Close to Cocoa, Very Vanilla, patterned papers - SU
Ink:  Walnut Stain Distress - Ranger; Versafine Onyx Black - Tsukineko
Punch:  Doily Lace - Martha Stewart
Other:  die cut tag - SU; poinsettia and holly die cut stickers - K & Co; ivory ribbon - Stamp Simply Ribbon; pearls

Viva La Verve

Tomorrow marks four weeks since my hysterectomy, and I'm grateful to have come such a long way in my recuperation.  This past week, with some help from my girls, I cleaned the house top to bottom, did some laundry, and put away the Halloween decorations (they were driving me crazy this late into the year).  After looking at what I did, in print, it really WAS too much.  And now, I am paying for it.

They say that when you have any kind of major surgery to "take it easy" and "don't do too much".  Well, when I felt so good, I wanted to get my normal routine back in place.  And I didn't realize I was doing too much until my body said, "WHOA!"  I've spent a good many hours lying down this weekend, to rest up.

I did manage to fit in some crafting for a challenge I've never done before.  It's Viva La Verve, over at Splitcoast.  They offer a sketch per week in a given month, and you have to do all four sketches to be entered for a $100 gift certificate at the Verve store.  That sounds reaaaallly good to me!  I'm entering late in the game, so bear with me while I throw several individual VLV posts your way.

First up, Week 1:

I've hoarded this Stampin' Up! patterned paper for a couple of years, but finally cut into it for this challenge.  You know how you pull out your best china, silver and crystal for a special guest?  That's how I feel about the Verve challenges.  They can be intimidating, for sure, so I am using things that haven't seen daylight in a while.

More hoarded stuff:  Little Felt Flurries by SU.  They came in a pack with red, Baja Blue, and white.  Well, the white didn't exactly look clean and white to me, rather a bit grayish and dirty.  So I took the snowflakes down to a workbench in the cellar and wanted to use spray adhesive and glitter to dress them up.  Guess what?  The can of spray adhesive was empty!  So I used Clear Acrylic Matte Sealer instead, then sprinkled the glitter on top.  Worked perfectly.  When the snowflakes were dry, I glued on pearls.


This sentiment comes from Bright Spirits, the set I won from Verve last week. And the blue ribbon comes from a Baby Gap shopping bag, which had ribbon handles.

I'm off to write my second Viva La Verve post now.  See you soon!

Colleen

Stamps:  Bright Spirits - Verve
Paper:  white - PTI; Sahara Sand, patterned paper - SU
Ink:  Versafine Onyx Black - Tsukineko
Punch:  Double Link Trim - Martha Stewart
Other:  ribbon - Baby Gap bag; Little Felt Flurries - SU; pearls; glitter

Thursday, November 17, 2011

Pastel Sleigh Ride

Although I love the outcome of this card, it was a BEAR to produce!  LOL  Took me a day and a half to iron out the details.

Last night I began thinking of ways to use this sketch from Mojo Monday -
I decided to combine it with a challenge from The Shabby Tea Room.  This is their inspiration photo:
And here is my card:

The music note background paper is Prima Madeline, the sleigh stamp is from Sleigh Ride and pine boughs from All That Glitters (Flourishes), and the sentiment is my NEW Verve set, Bright Spirits.


Last week I won a $25.00 gift certificate to the Verve store during their Release Party over at Splitcoast.  Whoo hoo!  I chose Bright Spirits because it's positively packed with sentiments and images.  And they shipped it to me lightning-fast, too.  :o)


These pretty snowflakes came in a $1.00 Scrap Bag from my Stampin' Up! demo.  I glitzed them up with SU clear glitter.

The sleigh is paper-pieced with another find from that Scrap Bag, Baja Breeze Designer Paper.  I added a dusting of glitter and a strip of pearls to the runners and a piece of lace to the side of the carriage.

I hope you enjoyed my fancy creation today.  Can you believe I've done a cute sock and a fancy sleigh in one day?  They're both so different!   I never know where my crafting hands will take me next.

Thanks for dropping by!

Colleen

Stamps:  sleigh - Sleigh Ride, pine bough - All That Glitters - both Flourishes; sentiment - Bright Spirits - Verve
Paper:  Madeline - Prima; white - PTI; Blushing Bride cardstock, Baja Breeze DSP - SU
Ink:  Versafine Onyx Black, Memento Tuxedo Black - Tsukineko; Mellow Moss - SU
Punch:  Lattice Edge - Martha Stewart
Other:  snowflake die cuts, clear glitter - SU; doily; lace trim - Offray; pearls


Play Date Cafe 108 - Sock It To Me


Maroon, copper and turmeric are the colors for this week's Play Date Cafe challenge.  Pretty exotic, huh?
Well, my creation is not at all exotic, but instead features an item we all use at one time or another:  a sock!


Isn't it cute??  My mind went blank at first when I saw that I had to combine these colors with a stamp set I have from our sponsor, Lawn Fawn, a set I love, by the way.  It's called My Silly Valentine.
I looked at the pair o' socks and thought, "Aha!  A gym sock, with glittery bands of our challenge colors!"

I sketched a sock free-hand, based on the shape of the socks in the stamp set.  I set the template over a 4.25" x 5.5" card and began trimming away the excess.  Easy peasy!

Here's a better look at those shimmery bands:


I used Martha Stewart glitter in Fire Opal, Carnelian and Cinnabar and some strips of Scor-Tape double-sided adhesive to create the lines.  My kids adored this little sock!

Feeling inspired by these colors?  Link up your creation in our gallery at The Cafe HERE.  Because of the upcoming Thanksgiving holiday (here in the US), this challenge will last for TWO WEEKS!  Go to the Play Date Cafe for more details.

Thanks so much for coming by today!

Colleen

Stamps:  My Silly Valentine - Lawn Fawn
Paper:  white - PTI
Ink:  Memento Tuxedo Black - Tsukineko
Other:  black journaling pen - SU; Martha Stewart glitter - Fire Opal, Carnelian, Cinnabar; Scor-Tape

Monday, November 14, 2011

Quick and Easy Christmas, Part 2

Hello!  I wanted to share another quick and easy Christmas card with you.
At Christmas Card Challenges, we are to be inspired by this picture:


Working with the colors from the inspiration pic, I made this with spare parts from my scrap box.  The flower was already stamped and assembled for another project a few years back.  It's Stampin' Up!'s Vintage Vogue.  The die cut is Elegant Flourishes by Sizzix/Tim Holtz.  This went together in a jiffy!

I've linked this card up to the monthly Christmas Card Challenge on Splitcoast, and also the Ways To Use It challenge there, which is SPACE (filling in the space around your card with something 3D).

I just finished wrapping up my card for Thursday's new challenge at The Play Date Cafe.  I can't wait for you to see it!  It's just too darn cute, if I say so myself.  :o)

Thanks for popping by!

Colleen

Stamps:  sentiment - Time To Chill - MFP; Vintage Vogue - SU
Paper:  Garden Green - SU; white - PTI
Ink:  Real Red, Basic Black - SU
Other:  Big Shot; Elegant Flourishes die - Sizzix/Tim Holtz; bling

Sunday, November 13, 2011

Candy Boxes

Every year, my girls love to make Candy Boxes for their friends as little Christmas gifts.  My Stampin' Up demo, Gail Murray, taught me how to do these several years ago.  I created a tutorial for you, in case you want to make them too.  Warning:  lots of pictures in this post!

Finished boxes:


You will need for each box:
  • 3 assorted patterned papers 
  • 3 coordinating scraps of cardstock
  • Stamps of your choice:  small image for Belly Band, greeting for inside
  • Ink
  • Circle punches:  1 1/4", 1 3/8", 1 3/4"
  • Adhesive
  • Paper trimmer & scoring tool
For this tutorial, I have used plain computer paper.  I have also drawn lines for demonstration purposes only.  Blue lines are for scoring, red dashed lines are for cutting

For box bottom:
Cut a piece of cardstock or patterned paper into a 6 7/8" square.
Score each side 1 7/8" from edges.
Trim off each corner, shown by the red dashes.
I use my paper trimmer to cut off the corners by lining up edges of scored lines in the trimmer's 'gutter' or channel.
This is what your box bottom should look like. 
Stamp sentiment or image inside square.
Pinch corners of box bottom as shown above and below.
Choose to leave corners as they are, or secure with adhesive (even Scotch tape).
For box top:
Cut a piece of patterned paper into a 5 1/8" square.
Score each side 15/16" from edges.
Cut each corner as shown, making sure that
cuts all run in the same direction.
Flip paper over to the side you want as the inside of the lid.
Place double-sided adhesive on corners marked with an "x".
Assemble corners as shown and place lid on box bottom.
For Belly Band:
Punches needed for label.
Stamp image, then punch circles in coordinating cardstocks; assemble with double-sided adhesive.
Cut 11" x 1" strip of patterned paper.
Adhere label to center of paper strip.
Lay strip and label over box lid,
centering label.  Do not secure.
Flip box and belly band over.
Place adhesive on one end of band, as shown.
Secure ends to each other.
Completed box. 
The belly band slips off box easily, and helps hold lid and box together in a pretty way.
Our projects, mid-way through assembly.
We need quite a few more!
I am entering this project at Tuesday Throwdown, where the challenge is to use our favorite color combo.  I LOVE red and green together for Christmas, especially this olive shade of green.

I do hope you have enjoyed this tutorial and want to give these a try.  They are easy to make, otherwise, my kids wouldn't want to do them!  LOL

Colleen
Related Posts Plugin for WordPress, Blogger...